In this article, we will explore the best methods for effectively draining an air compressor tank. If you’ve ever wondered about the most efficient way to remove excess moisture from your compressor, you’re in the right place! We’ll discuss step-by-step procedures and provide helpful tips to ensure a smooth drainage process. So, whether you’re a DIY enthusiast or a professional in need of some guidance, get ready to discover the tried-and-true techniques for keeping your air compressor tank in top-notch condition.
Understanding the Need for Draining an Air Compressor Tank
Explaining the function of an air compressor tank
An air compressor tank is an essential component of an air compressor system. Its main function is to store pressurized air that can be used for various applications such as powering pneumatic tools, inflating tires, and even operating machinery in industrial settings. The tank allows the compressor to build up pressure, ensuring a steady supply of compressed air when needed.
Elaborating on why regular draining is necessary
Regular draining of the air compressor tank is crucial for maintaining the efficiency and longevity of the system. During the compression process, moisture present in the air condenses and collects in the tank. If this moisture is not drained regularly, it can lead to various issues such as corrosion, rust, and reduced performance of the air compressor system. Additionally, the presence of moisture can cause damage to pneumatic tools and other equipment that rely on clean, dry air.
Discussing the risks of not draining your tank properly
Failing to drain the air compressor tank properly can result in several risks and potential problems. Firstly, the accumulated moisture can mix with any oil residue in the tank, leading to the formation of sludge. This sludge not only reduces the efficiency of the air compressor but can also block filters and valves, causing damage to the entire system. Secondly, the moisture can corrode the tank from the inside out, weakening its structural integrity and compromising safety. Lastly, if the tank is not regularly drained, the excess moisture can be carried throughout the pneumatic system, resulting in waterlogged tools and reduced performance.
Locating the Drain Valve on Your Air Compressor Tank
Description of a typical drain valve
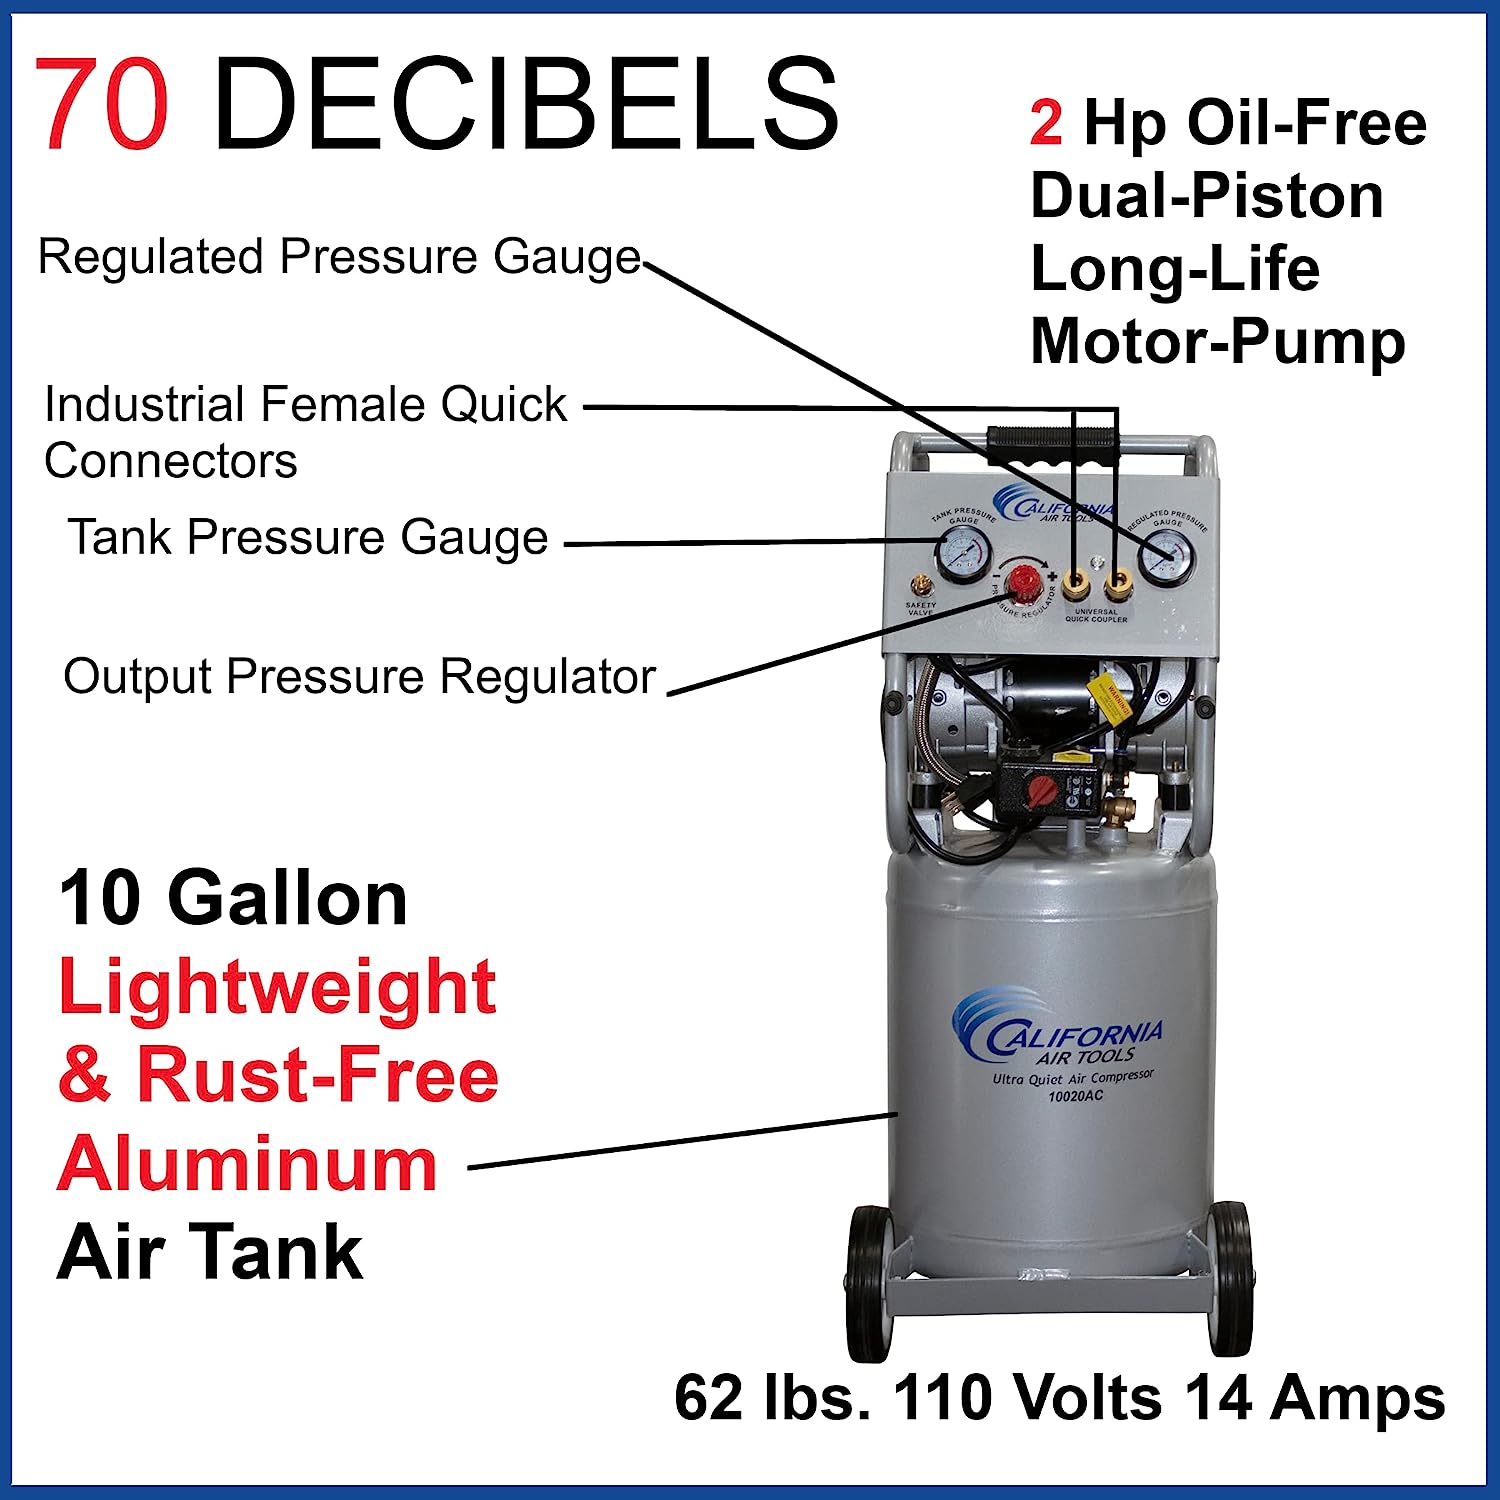
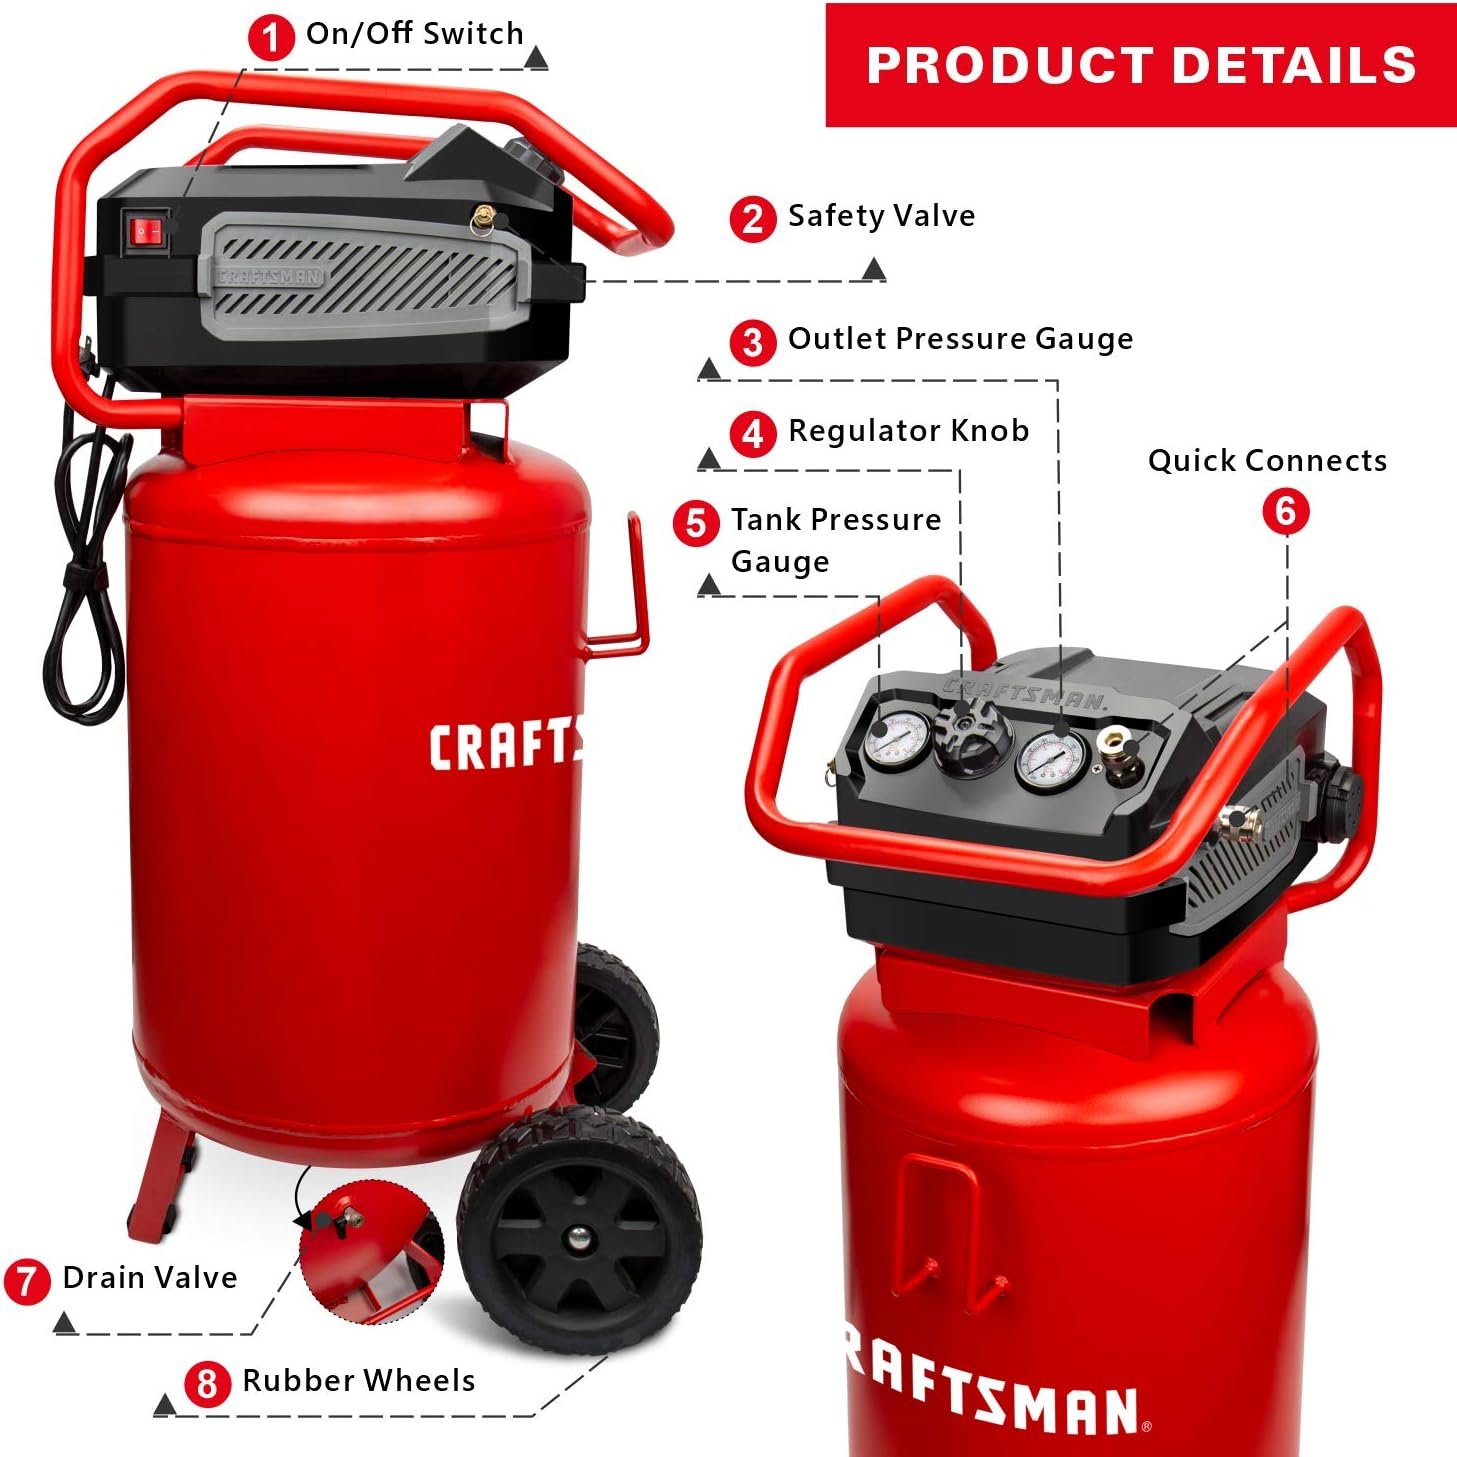
The drain valve is a small, usually brass or steel, fitting located at the bottom of the air compressor tank. It serves as the point of release for any accumulated moisture in the tank. Drain valves can come in different designs, but most are operated manually by twisting or turning the valve to open or close it. Some drain valves may also have a threaded connector, allowing for the attachment of additional accessories such as hoses or automatic drain systems.
Guidance on where to find the drain valve on different models
The exact location of the drain valve will vary depending on the make and model of your air compressor. However, in most cases, you can find the drain valve near the bottom of the tank, usually at one end or on the side. It can be accessed by crouching down and looking for a small valve protruding from the tank. Some air compressors may have a hose attached to the drain valve, allowing for easy disposal of the drained moisture. Refer to your compressor’s manual or contact the manufacturer if you are having trouble locating the drain valve on your particular model.
Covering safety precautions when dealing with the drain valve
Whenever you engage with the drain valve on your air compressor tank, it is vital to prioritize safety. First and foremost, make sure the air compressor is turned off and disconnected from any power source before attempting to drain the tank. This eliminates the risk of accidental starts or electrical shocks. Additionally, always wear appropriate personal protective equipment (PPE), such as gloves and eyewear, to protect yourself from any moisture, debris, or potentially harmful materials that may be released during the draining process. Finally, ensure a safe disposal method for the drained moisture, such as a designated drain or receptacle, to prevent any environmental hazards.
Ongoing Maintenance: Importance of Regular Drainage
Frequency of draining a compressor tank
The frequency of draining an air compressor tank depends on various factors such as the size of the tank, the humidity levels in your environment, and the frequency of use. As a general rule of thumb, it is recommended to drain the tank after each use or at least once a day for smaller tanks. Larger tanks may require more frequent drainage due to their larger capacity and the potential for greater moisture accumulation. It is essential to monitor the condition of the tank and drain it promptly whenever moisture buildup is observed.
Possible implications of infrequent draining
Failing to drain your air compressor tank on a regular basis can have significant implications on the overall performance and lifespan of the system. When moisture is allowed to accumulate unchecked, it can cause severe corrosion and rusting within the tank. This corrosion can weaken the structural integrity of the tank and lead to leaks or ruptures, putting you and others at risk of injury. Furthermore, the presence of excessive moisture in the air compressor system can also result in decreased efficiency, reduced tool lifespan, and potential damage to downstream equipment.
Benefits of maintaining a regular draining schedule
By adopting a regular draining schedule for your air compressor tank, you can enjoy several benefits. Firstly, it helps prevent the buildup of moisture and contaminants, ensuring clean and dry air for your applications. This promotes optimal tool performance and prolongs their lifespan. Regular draining also reduces the risk of corrosion and rust formation within the tank, extending its overall durability and safety. Furthermore, consistent moisture removal helps maintain the efficiency of the air compressor system, resulting in energy savings and lower maintenance costs in the long run.
Drainage Techniques: Using the Manual Method
Step by step guide to manually draining your tank
- Prepare for drainage by turning off the air compressor and disconnecting it from the power source.
- Put on personal protective equipment (PPE) such as gloves and eyewear.
- Locate the drain valve at the bottom of the air compressor tank.
- Place a container or hose beneath the drain valve to collect the drained moisture.
- Slowly open the drain valve by turning or twisting it counterclockwise. Be cautious as the moisture starts to flow.
- Allow the moisture to drain fully, ensuring there is no more moisture coming out of the tank.
- Close the drain valve by turning it clockwise to prevent any air or moisture leakage.
- Dispose of the collected moisture in a suitable manner, following local regulations and guidelines.
Safety measures to observe while manually draining
When manually draining your air compressor tank, it is crucial to follow safety measures to prevent any accidents or injuries. Firstly, always remember to wear appropriate PPE such as gloves and eyewear. This protects you from any moisture, debris, or chemicals that can get released during the drainage process. Additionally, keep in mind that the drained moisture may be hot, so exercise caution to prevent burns. Lastly, be mindful of your surroundings and ensure there is adequate ventilation during the draining process to avoid the buildup of potentially harmful fumes.
Understanding the limitations of manual draining
While manual draining is a straightforward and effective method for removing moisture from an air compressor tank, it may have some limitations in certain scenarios. For example, in large-scale air compressor systems with significantly larger tanks, manual draining may be time-consuming and impractical. Additionally, manual draining requires regular monitoring and timely action to prevent moisture buildup. Hence, if you have a busy schedule or frequently forget to drain the tank, it may be worth considering alternative drainage techniques such as automatic drain valves or implementing drainage systems.
Drainage Techniques: Using an Automatic Drain Valve
Explanation of an automatic drain valve
An automatic drain valve is a device that eliminates the need for manual draining by automatically removing accumulated moisture from the air compressor tank. This type of valve is typically installed at the bottom of the tank and is designed to open and close based on preset parameters such as time, pressure differentials, or moisture levels. Automatic drain valves can significantly simplify the maintenance of an air compressor system, ensuring consistent and efficient moisture removal.
Pros and cons of using automatic drain valves
Using an automatic drain valve offers several advantages over manual draining techniques. Firstly, it eliminates the need for frequent monitoring and manual intervention, saving time and effort. Automatic drain valves can operate on a predetermined schedule or based on the presence of moisture, ensuring optimal drainage without human intervention. Additionally, automatic drain valves can prevent excessive moisture buildup, reducing the risk of corrosion, rust, and other related issues. However, it is important to note that automatic drain valves may have higher upfront costs, require periodic maintenance, and may be more complex to install compared to manual draining methods.
Procedure for setting up an automatic drain valve
Setting up an automatic drain valve requires careful consideration and adherence to the manufacturer’s instructions. Here is a general procedure to follow:
- Turn off the air compressor and disconnect it from the power source.
- Identify a suitable location for the automatic drain valve at the bottom of the air compressor tank.
- Ensure that there is proper clearance and accessibility for the drain valve installation.
- Consult the manufacturer’s instructions for specific requirements and guidelines for installing the automatic drain valve.
- Attach the automatic drain valve to the tank, ensuring a secure and leak-free connection.
- Connect any required hoses or piping to direct the drained moisture to a suitable disposal point.
- Configure the automatic drain valve’s settings based on your preferences and the manufacturer’s recommendations.
- Test the automatic drain valve to ensure proper operation and adjust any parameters if necessary.
- Once satisfied with the setup, reconnect the compressor to the power source and resume normal operation.
Implementation of Air Compressor Tank Draining Systems
Differences between different drainage systems
Air compressor tank draining systems can be broadly categorized into two types: primary drainage systems and secondary drainage systems.
Primary drainage systems are responsible for removing the majority of the moisture from the air compressor tank. They typically consist of drain valves, either manual or automatic, that are directly connected to the tank. These systems ensure regular moisture removal and prevent excessive buildup.
Secondary drainage systems are supplementary to the primary drainage systems and provide additional moisture removal capabilities. They are usually mounted downstream from the primary drainage system and help remove moisture that may have bypassed the primary system. Secondary systems often incorporate features such as filters, separators, and centrifuges to further eliminate moisture and contaminants from the compressed air stream.
Selecting a suitable drainage system for your air compressor
When selecting a drainage system for your air compressor, it is important to consider factors such as the size and type of your air compressor, the expected moisture load, and your specific application requirements. Manual drain valves are often sufficient for smaller air compressors with low moisture levels and infrequent use. However, larger air compressors or those used in demanding industrial applications may benefit from the installation of automatic drain valves or comprehensive drainage systems that incorporate both primary and secondary components. Consult the manufacturer or an industry expert to determine the most suitable drainage system for your specific needs.
Installation of primary and secondary drainage systems
The installation of primary and secondary drainage systems typically involves the following steps:
- Turn off the air compressor and isolate it from the power source.
- Identify suitable locations for the drain valves of the primary drainage system and the components of the secondary drainage system.
- Install the drain valve of the primary drainage system at the bottom of the air compressor tank, ensuring a secure connection.
- Connect any required hoses or piping to facilitate the drainage from the primary system to a designated discharge point.
- Install the secondary drainage system components downstream from the primary drainage system, following the manufacturer’s instructions and guidelines.
- Ensure proper alignment and connection of filters, separators, or centrifuges in the secondary system.
- Perform a thorough inspection of all connections to ensure there are no leaks or potential sources of air or moisture loss.
- Reconnect the air compressor to the power source and power it on to test the drainage systems’ functionality.
- Monitor the drainage systems closely during initial usage to verify proper operation and make any necessary adjustments.
Addressing Common Issues During Drainage
Listing common problems that arise during draining
While draining an air compressor tank, several common issues may arise, including:
- Clogged drain valve: The drain valve may become clogged with debris or sludge, preventing proper drainage.
- Leaky drain valve: There may be a leak at the drain valve, resulting in air or moisture leakage.
- Inadequate moisture removal: The drainage system may not effectively remove all the accumulated moisture, leading to excessive moisture in the tank.
- Incorrect timing or settings: Automatic drain valves may have incorrect timing or settings, causing inefficient or insufficient drainage.
- Freezing: In cold climates, the drained moisture may freeze, blocking the drain valve or causing other issues.
Offering solutions to these common problems
To address the common problems encountered during drainage, consider the following solutions:
- Clogged drain valve: Regular maintenance and cleaning of the drain valve can prevent clogs. Use appropriate cleaning tools and techniques to remove any debris or sludge.
- Leaky drain valve: Check the drain valve for any loose connections or damage and tighten or repair as necessary. Consider replacing the drain valve if the leakage persists.
- Inadequate moisture removal: Ensure that the drain valve is fully open during drainage and that the drainage system is properly configured. Consider using additional filtration or separation components to improve moisture removal.
- Incorrect timing or settings: Review the manufacturer’s instructions for the automatic drain valve and adjust the timing or settings accordingly. Regularly check and recalibrate the settings as needed.
- Freezing: Insulate the drain valve or provide a heat source to prevent freezing. You can also consider installing an automatic drain valve with anti-freeze features to minimize this issue.
Proactive steps to prevent these common problems
To minimize the occurrence of common drainage problems, adopt the following proactive steps:
- Conduct regular inspections of the drain valve and the entire drainage system to identify any potential issues or signs of wear.
- Follow a consistent maintenance schedule, including cleaning and lubricating the drain valve to prevent clogs and ensure smooth operation.
- Monitor the moisture levels in your compressed air system and adjust the drainage frequency or system configuration accordingly.
- Educate and train operators on proper drainage procedures, safety measures, and the signs of potential problems.
- Keep spare parts and replacement drain valves readily available to address any unexpected issues promptly.
Draining Process: Safety Measures to Observe
Safety gear required during the process
When engaging in the draining process of an air compressor tank, it is crucial to wear appropriate safety gear to protect yourself from any potential hazards. The following safety gear is recommended:
- Safety goggles or a face shield: Protect your eyes and face from any moisture, debris, or chemicals released during the drainage process.
- Work gloves: Prevent cuts, burns, or contact with potentially harmful substances.
- Protective clothing: Wear long sleeves and pants to minimize direct skin exposure to any moisture or debris.
- Closed-toe shoes: Protect your feet from any potential falling objects or spills.
Preventive steps to avoid accidents during draining
To prevent accidents or mishaps during the draining process, consider taking the following preventive steps:
- Start by turning off the air compressor and disconnecting it from the power source to eliminate the risk of accidental starts or electrical shocks.
- Ensure a stable and level surface for the air compressor to prevent any tipping or falls during the drainage process.
- Position a suitable container or hose beneath the drain valve before opening it to collect the drained moisture and prevent spills.
- Use caution when opening the drain valve, as the accumulated moisture may be hot and can cause burns. Allow the moisture to cool if necessary.
- Maintain a clear and well-ventilated workspace to prevent the buildup of potentially harmful fumes or gases.
- Dispose of the drained moisture in accordance with local regulations and guidelines. Do not discharge it in areas that can cause harm or environmental damage.
What to do in the event of a draining accident
In the event of a draining accident, it is important to remain calm and follow the appropriate steps to minimize any potential harm:
- If an injury occurs, seek immediate medical attention, especially for burns, cuts, or any signs of chemical exposure.
- Shut off the air compressor and the power source, if not already done, to prevent further accidents.
- Clean up any spills or leaks promptly and dispose of any hazardous materials safely.
- Inspect the air compressor and the drainage system for any damage or potential issues. Repair or replace any damaged components as necessary.
- Evaluate the circumstances surrounding the accident and take measures to prevent similar incidents in the future, such as implementing additional safety protocols or modifying procedures.
Advanced Drainage Practices for Larger Systems
Differences in draining large professional systems
Draining large professional air compressor systems often requires more advanced techniques and considerations compared to smaller systems. Some key differences include:
- Increased moisture load: Larger systems tend to have higher moisture loads, requiring more robust drainage capabilities to prevent excessive moisture accumulation.
- Complex piping network: Large systems may have intricate piping networks, with multiple points of moisture collection. Proper planning and system design are essential for effective drainage.
- Multiple drain points: It may be necessary to install multiple drain valves or automatic drainage systems at different points within the system to ensure comprehensive moisture removal.
- Enhanced automation: Large professional systems may require more advanced control systems and automated drainage techniques to handle the size and complexity of the system efficiently.
How to use automated systems for large-scale drainage
To manage drainage for larger-scale air compressor systems, automated systems are often employed. These systems utilize sensors, timers, or advanced control units to monitor and regulate the moisture removal process. Here are steps to use automated systems for large-scale drainage:
- Assess the moisture load and drainage requirements of your specific system, taking into account factors such as system size, operating conditions, and industry standards.
- Consult with air compressor specialists or manufacturers to determine the most suitable automated drainage systems for your specific needs.
- Install the automated drainage system, following the manufacturer’s instructions and guidelines. This may involve incorporating sensors, timers, or advanced control units into the existing system.
- Configure the automated system settings, such as drainage frequency, duration, or trigger conditions, based on your requirements and the manufacturer’s recommendations.
- Test the automated drainage system thoroughly to ensure proper operation and make any necessary adjustments.
- Monitor the system regularly for performance and make periodic inspections and maintenance to ensure continued efficiency and reliability.
Maintenance schedules for large air compressor systems
To maintain the optimal performance and longevity of large air compressor systems, it is necessary to establish a robust maintenance schedule that includes regular drainage. The frequency of maintenance will depend on various factors, including system size, operating conditions, and manufacturer recommendations. However, as a general guideline, consider the following maintenance schedule for large air compressor systems:
- Daily: Drain the air compressor tank and inspect the drainage system for proper operation.
- Weekly: Check and clean filters and separators to remove any accumulated debris or contaminants.
- Monthly: Perform a comprehensive inspection of the entire system, including all components, hoses, and connections. Look for signs of wear, leaks, or any potential issues.
- Biannually or annually: Engage in more extensive maintenance activities such as lubricating moving parts, replacing worn-out parts, or calibrating automated drainage systems. Consider involving professional technicians or experts for thorough system checks.
Additional Tips for Efficient and Effective Draining
Using timers for automatic draining
In addition to sensing moisture levels, automatic drain valves can often be equipped with timers to control the drainage frequency and duration. Setting the timers properly ensures efficient and effective drainage. Consider the following tips when using timers for automatic draining:
- Determine the optimal drainage frequency based on factors such as the moisture load, system size, and usage patterns.
- Avoid excessive or insufficient drainage by adjusting the timer settings accordingly.
- Consider staggering the timing of multiple automatic drain valves within a system to prevent overwhelming the drainage capacity or causing undesired pressure drops.
- Regularly inspect and recalibrate the timers to ensure they remain accurate and aligned with the desired drainage schedule.
Considerations when draining in different climate conditions
Climate conditions can significantly impact the moisture accumulation and drainage requirements of air compressor tanks. Here are some considerations when draining in different climate conditions:
- Humid environments: In areas with high humidity, more frequent draining may be necessary due to increased moisture levels in the compressed air. Monitor the tank closely for signs of excessive moisture buildup and adjust the drainage frequency accordingly.
- Cold environments: In colder climates, drained moisture can freeze, causing blockages or even damage to the drain valve or other components. Insulate the drain valve and consider using anti-freeze additives or automatic drain valves with anti-freeze features to prevent freezing.
- Hot and dry environments: While hot and dry environments may not pose a significant moisture accumulation issue, regular drainage is still necessary to remove any moisture that may have condensed during normal operation.
- Variable climate conditions: If your air compressor system operates in an environment with significant climate variations, adjust the drainage frequency and other system parameters accordingly. Regularly monitor the moisture levels and adjust drainage practices as needed.
Tips on maintaining an air compressor to minimize draining requirements
Proper maintenance of an air compressor system can help minimize excessive moisture accumulation and reduce the frequency of draining. Consider the following tips to maintain your air compressor effectively:
- Regularly inspect all components, including hoses, fittings, and seals, for any signs of leaks or wear. Repair or replace any damaged parts promptly to prevent moisture entry into the system.
- Clean or replace filters and separators according to the manufacturer’s recommendations. Preventing debris and contaminants from entering the system reduces the moisture load and improves overall system performance.
- Lubricate moving parts and motors following the manufacturer’s guidelines. Adequate lubrication reduces friction and heat buildup, contributing to better moisture control.
- Use compressed air dryers or moisture-removal systems in conjunction with proper drainage techniques to further reduce moisture levels in the compressed air stream.
- Train and educate operators on best practices for using and maintaining air compressor systems, including proper drainage procedures and ensuring the system is shut down correctly after use.
In conclusion, understanding the need for draining an air compressor tank is essential for the efficient and reliable operation of your air compressor system. Regular drainage prevents the accumulation of moisture, which can lead to corrosion, reduced performance, and other issues. By locating the drain valve on your air compressor tank and following the appropriate drainage techniques, such as manual or automatic methods, you can effectively remove moisture and ensure the longevity of your system. Implementing proper drainage systems, addressing common issues, and observing safety measures during the draining process are crucial for safe and efficient maintenance. For larger systems, advanced drainage practices and regular maintenance schedules are paramount. By following these guidelines and incorporating additional tips for efficient and effective draining, you can optimize the performance and lifespan of your air compressor tank while minimizing the need for excessive drainage.

Joey has over 15 years of experience in the air compressor industry. As a senior test manager at Pneumatic Performance Labs, he oversees all testing and evaluation of air compressors. Known for his technical expertise and leadership, Joey has built a strong team of engineers who provide trusted third-party testing capabilities to air compressor companies nationwide.